

Bread Machine Dinner Rolls
I have a versatile White Bread recipe, for bread machines, that I want to share with you and in the process share a few tips that I have found helpful in perfecting a excellent loaf or dough from a bread machine.


 Place bread pan in the machine, and set the proper settings. If you are going to make a loaf of bread out of this use the 2 lb white bread setting on light to medium crust.
 We are making Dinner Rolls so we are going to use the dough mode. I use this setting ninety-five percent of the time. It works perfectly. The machine does all the work, and then you can take the dough out and make phenomenal dinner rolls, in all shapes and sizes, or cinnamon rolls, or cinnamon bread. The skies the limit!
 4. Don’t be afraid to open up the top. You don’t want to stand there half the time with the top off, because that will mess up the temperature that needs to be maintained for the bread to rise properly. But you do need to make sure everything is mixing properly, if not you may need to give things a little help.
 See how the ingredients have been shoved to the corner and are not mixing in, stick a spatula along the side and help that flour into the dough.
 This is what your ball of dough should look like. Firm and smooth and not too dry or too wet.


 Place them on a baking sheet sprayed with non-stick cooking spray. Cover with a cloth and set in warm place for half hour to rise. Pop them in a 375 degree oven and bake for 12-15 minutes.

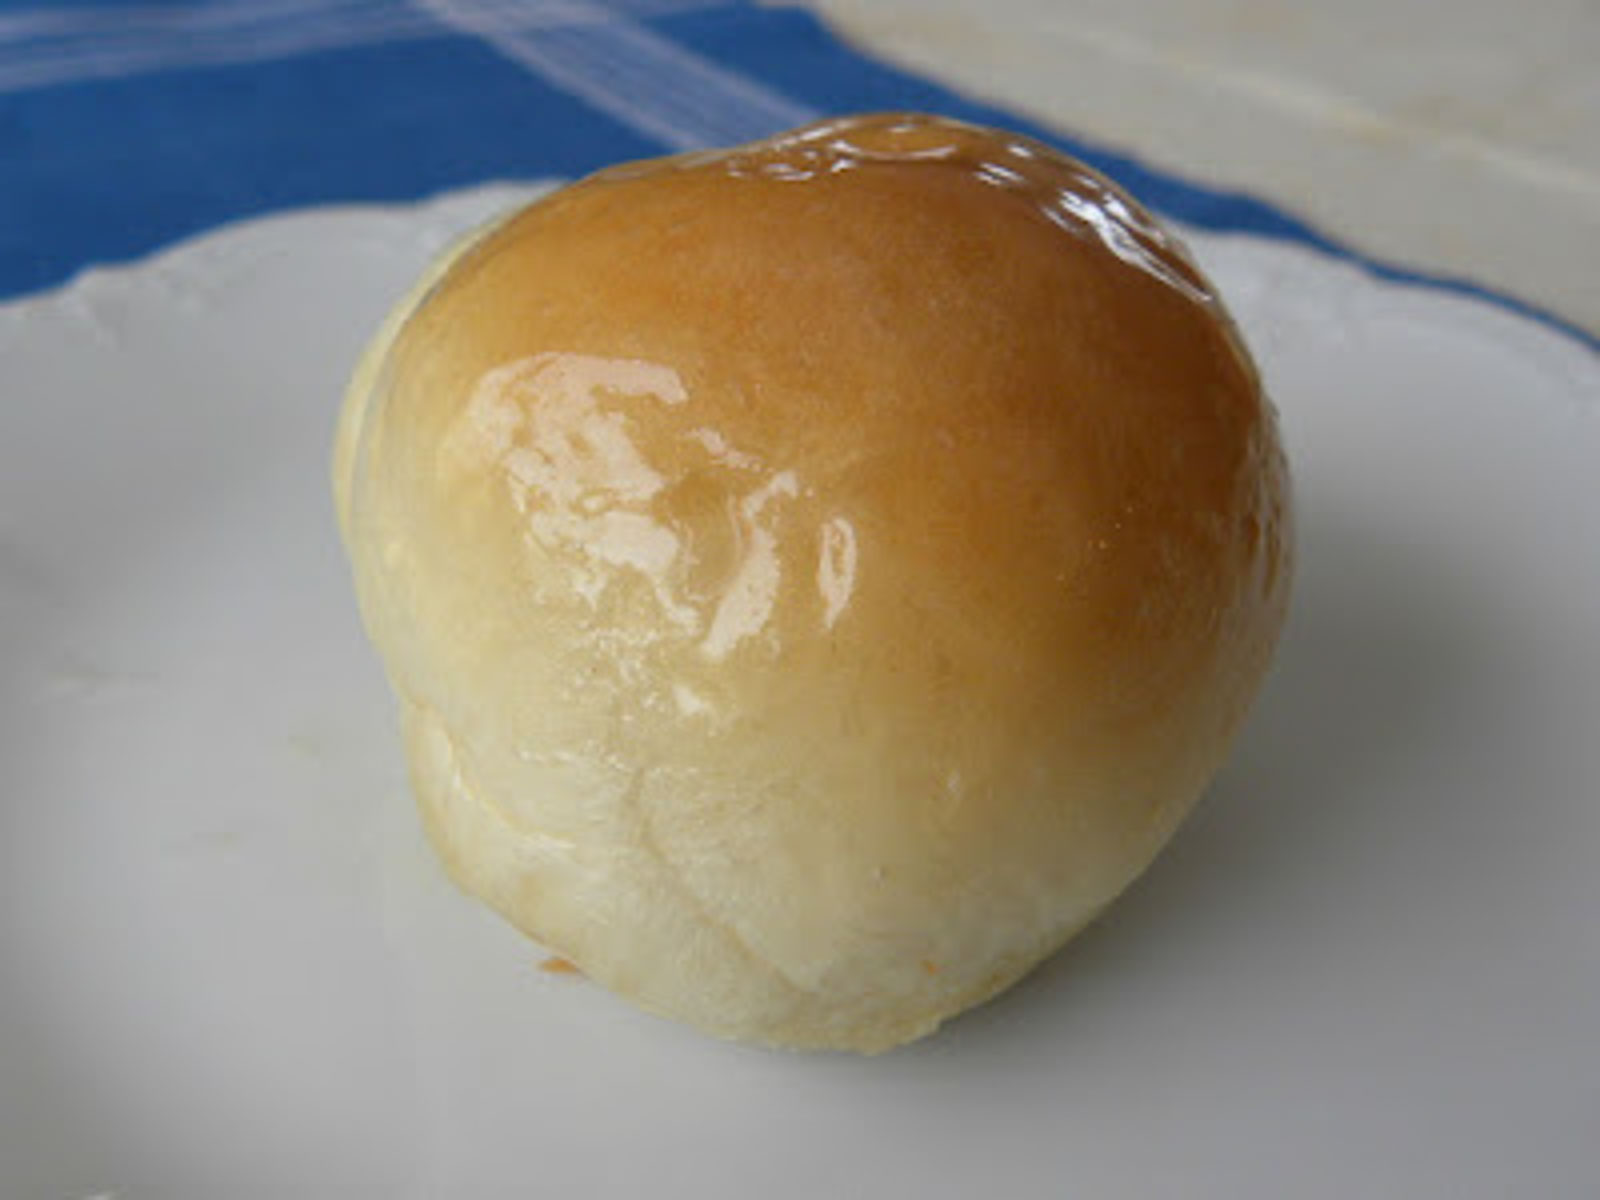
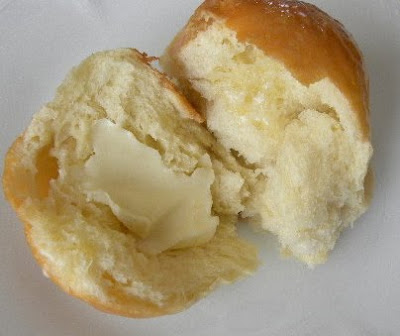
 I like to take a stick of butter and rub it all over the rolls when they are hot out of the oven.
  Well then of course you need to butter them on the inside too. Actually these rolls are so good, you could leave the butter step out, but why? I will not disclose how many dinner rolls were eaten in the making of this post. These dinner rolls are to die for and so very easy if you have a bread machine!

The tips I shared with you in this post can be found in Better Homes and Gardens Bread Machine Cookbook. This book is indispensable if you want to make the most of your bread machine. It has many tips, and every recipe I have used in this cookbook has turned out perfectly. However, the above recipe is not in this cookbook. It was graciously given to me by my sister-in-law, to whom I will be indebted for my ever-growing mid-section due to excessive dinner roll consumption. I’m tellin’ ya you can’t eat just one!
Oh, I hope I have not given you too much information. Using your bread machine should be simple and easy and should be done often. So, if you are sequestering your bread machine away in some dark, dank place in your home, do the guy a favor, haul him out, and make your family some rolls, Man!
Peace, Love, & Dinner Rolls,
Sheila
Bread Machine Dinner Rolls
Equipment
- 1 bread machine
- 1 baking sheet
Ingredients
- 1 cup luke warm water
- 2 tbsp butter
- 1 whole egg
- 1/4 cup sugar
- 3 1/4 cups bread flour
- 1 tsp salt
- 3 tsp active dry yeast
- 2 tbsp melted butter for brushing on top of rolls after baking
Instructions
Important that you follow order of directions for the best results
- Add lukewarm water, softened butter, and egg to pan.
- Add sugar to pan.
- Add bread flour to pan and make a well in the middle add yeast to the well.
- Sprinkle salt around the edges of the pan away from the middle where the yeast is.
- Set bread machine on dough setting. 10 minutes into the first kneading process take a peak into the pan, if there are dry ingredients sticking to the corners add a tablespoon or two of extra water and help ingredients out of the corner with a spatula.
- When dough is done separate into 16 equal pieces, pull pieces into round balls, place on a lightly greased baking sheet, cover with a cloth, and let rise for 30 minutes in a warm area of your kitchen. If you have a proof setting on your oven use that.
- Preheat oven to 375 degrees. After proofing time is done, place rolls in oven for 12-15 minutes, remove from oven and brush with butter.
Nutrition


I made 16 wonderful rolls from this recipe yesterday Today, however, I wanted to make a loaf of bread, which I did but it raised so high in less than half an hour. I baked it and of course, it rose even higher!
I think this recipe should be used for 2 loaves instead of one!
You might be right! I hope you enjoyed your big ol’ loaf of bread! Thanks for taking the time to let me know how it turned out.
Oh my goodness! These were THE best rolls ever!! Your directions were on point! I am now following you because I like your “fun” in your directions and the end result was better than I expected! Thank you for making our Thanksgiving dinner tonight even better!
Thanks so much!! I’m so glad you love these rolls as much as we do! In fact your comment reminded me I need to make them again soon!
Making these rolls for the third time in 2 weeks! They remind us of the soft rolls we get at the Chinese restaurant. My kids LOVE these (they call them the “softy rolls”) & they’re so easy to make. Thank you!
Love it! They are softy rolls aren’t they?! So addicting! Glad your family enjoys them, thanks for stopping by. XO, Sheila
What if I want to make the dough in advance in my bread machine, form the rolls & freeze them so I can thaw,raise & bake them at a later date?
I have never done this, but I’m sure it would work! Let me know how it goes if you think about it. Thanks Kathy!
I made this on Saturday, rolls first batch, then a loaf, best I have ever made. I love using my bread machine for the dough
Thank you for your feedback! I’m so glad that you love this recipe as much as we do! Happy New Year 😉
Quwstion
Do you have to cook the rolls soon as they rise are can you cook the next day without g hem falling
Thats a good question, I have always baked them right away. I think after you take the dough from the bread machine you could put in the refrigerator for a day, then form the rolls, let rise and bake. However, I have never tried it this way so I am only guessing from experience with other dough. Hope this helps let me know what you find out! Thanks, Sheila
I am making your rolls right now for Sunday dinner tomorrow.. They are still in machine. I just wanted to let u know. And when they turn out great I will post them on fb. Your rolls look fantastic. This is my first try with this recipe.
Paula, I hope they turned out amazing for you! I don’t think I’ve ever had a fail with that recipe. Thanks for stopping by and taking the time to comment! XO, Sheila
I came across your recipe last fall and have used it for Thanksgiving, Christmas & the Super Bowl party at our house. Today I woke up too early so decided to make cinnamon rolls for my college son who is home on spring break. Thanks for this recipe – – it is the only roll recipe I will use from now on!
Thanks Jeanne for taking the time share! I’m so glad you’ve had as much success with these rolls as I…my family loves them too! Enjoy your boy while he’s home xox, Sheila
I used this recipe and made bread instead of rolls. It was great. My girls are already ate the entire loaf. Great recipe. I had never made bread from scratch, always was a box mix. Never again will I buy bread again. No preserves or other things I cant pronounce in my bread again.
Thanks for taking the time to let me know! So glad you love this recipe as much as my family does. xox Sheila
Trace, Thanks for setting me straight on the rolls ;D! Thanks for reading, Luvya, Sheil
Hey She, I feel compelled to correct you on something…and to prove to you that I DO read your blog 🙂 The rolls that you have placed so nicely in the muffin tin are called cloverleaf rolls (hence the three little balls), not parkerhouse rolls. Parkerhouse rolls are rectangle and folded over on themselves, for easy opening. I only know this from my years working at good ol' Meijer bakery. AND parkerhouse rolls used to be my Jessica's favorite roll. Now after that being said, I really don't care what they are called…they look DELICIOUS!! Thanks for sharing!! 🙂
Thanks for sharing…just what this girl needs in her life! MORE BREAD!
Hi Sheila,
I came to your blog through Pioneer Woman. I love the look of your blog (adorable header!), and this recipe looks great!
I have a really hard time with making yeast breads from scratch, but I love the idea of my bread machine doing the kneading/rising! These look great, thanks for sharing!
Claire, I bought my bread machine at Sears it's a Kenmoor. I have been super happy with it. Happy bread makin'! Sheila
SERIOUSLY! I just drooled all over my keyboard 🙂 If you don't mind, would you tell me what kind of bread machine you're using? I would love to get one. I want to make more bread this year and I love to knead with my hands. The only thing is my carpal tunnel has been really bad lately and would love the help of a bread machine.
i DO remember my bread machine! used it for years but then it just took up way too much retail space so i got rid of it plus, i was trying to cut down my bread consumption – LOL!! a machine makes having bread much too easy!! beautiful recipe!
Your rolls look perfect! Headed to the kitchen to pull out my bread machine now. 🙂
These look completely delicious!!
Yum, Sheila. Those rolls look divine. I made some non-bread machine rolls last week. They were definitely NOT blog worthy. I never knew about the pinching and tucking. I had been rolling. Maybe that was part of the problem but whatever it was, they did not look as scrumptious as yours!